Browser Use
Roo Code provides sophisticated browser automation capabilities that let you interact with websites directly from VS Code. This feature enables testing web applications, automating browser tasks, and capturing screenshots without leaving your development environment.
Browser Use within Roo Code requires the use of Claude Sonnet 3.5 or 3.7. Other models do not currently support browser automation features.
Simply ask Roo to visit a website or interact with a web page. The browser will launch automatically when needed - no setup required!
Overview
Browser Use transforms Roo Code into a powerful web automation assistant. Whether you're testing your web application, gathering information from websites, or automating repetitive browser tasks, Roo can handle it all through an integrated browser that runs seamlessly within your development environment.
Key Capabilities
- Automated Web Testing: Test your web applications by having Roo interact with forms, buttons, and navigation
- Information Gathering: Extract data from websites, check page layouts, and verify content
- Screenshot Capture: Automatically capture and analyze web page screenshots
- Form Interaction: Fill out forms, submit data, and interact with complex web interfaces
- Cross-Browser Testing: Verify your site works correctly across different viewport sizes
- Session Persistence: Maintain authenticated sessions when using remote browser connections
How Browser Use Works
By default, Roo Code uses a built-in Puppeteer-controlled browser that:
- Launches automatically when you ask Roo to visit a website
- Captures screenshots of web pages for visual analysis
- Allows Roo to interact with web elements through clicks, typing, and scrolling
- Runs invisibly in the background (headless mode)
- Closes automatically when the task is complete
All of this happens directly within VS Code, with no additional setup required.
Browser Session Lifecycle
- Launch: Browser starts when you request web interaction
- Navigate: Roo opens the specified URL
- Interact: Performs requested actions (click, type, scroll)
- Capture: Takes screenshots after each action
- Analyze: Roo examines the page state and console output
- Close: Browser terminates when task completes
Using Browser Use
Basic Usage
A typical browser interaction follows this pattern:
Important: Browser Use requires Claude Sonnet 3.5 or 3.7 model.
- Ask Roo to visit a website
- Roo launches the browser and shows you a screenshot
- Request additional actions (clicking, typing, scrolling)
- Roo closes the browser when finished
Example Requests
Simple Website Check:
Open the browser and view our site at https://example.com
Testing Local Development:
Can you check if my website at http://localhost:3000 is displaying correctly?
Complex Interaction:
Browse http://localhost:3000, scroll down to the bottom of the page and check if the footer information is displaying correctly. Then click the "Contact" link and verify the contact form is working.
Form Testing:
Go to our contact form at https://example.com/contact, fill in the form with test data, and verify the validation messages appear correctly.

How Browser Actions Work
The browser_action tool controls a browser instance that returns screenshots and console logs after each action, allowing you to see the results of interactions.
Key Characteristics
- Sequential Operations: Each browser session must start with
launchand end withclose - Single Action Per Message: Only one browser action can be used per message
- Exclusive Tool Use: While the browser is active, no other tools can be used
- Response Feedback: You must wait for the response (screenshot and logs) before performing the next action
- State Persistence: The browser maintains state between actions within a session
Available Browser Actions
| Action | Description | When to Use | Example |
|---|---|---|---|
launch | Opens a browser at a URL | Starting a new browser session | Testing homepage load |
click | Clicks at specific coordinates | Interacting with buttons, links, etc. | Submitting forms |
type | Types text into active element | Filling forms, search boxes | Entering user credentials |
scroll_down | Scrolls down by one page | Viewing content below the fold | Checking footer content |
scroll_up | Scrolls up by one page | Returning to previous content | Navigating back to header |
close | Closes the browser | Ending a browser session | Cleanup after testing |
Action Sequencing
Browser actions must follow a logical sequence:
launch → navigate → interact (click/type/scroll) → capture → close
Each action builds on the previous state, allowing complex multi-step interactions.
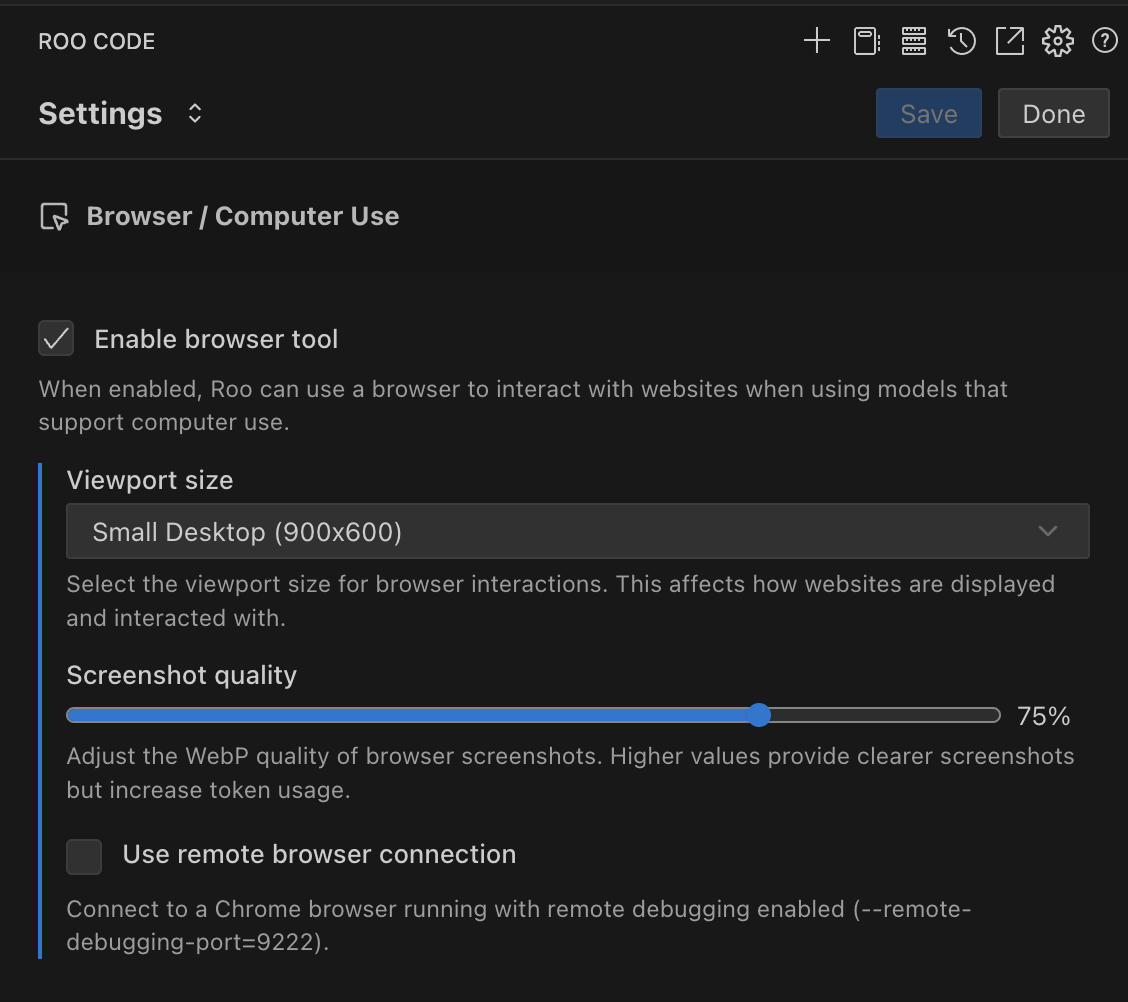
Browser Use Configuration/Settings
- Enable browser tool: Enabled
- Viewport size: Small Desktop (900x600)
- Screenshot quality: 75%
- Use remote browser connection: Disabled
Accessing Settings
To change Browser / Computer Use settings in Roo:
-
Open Settings by clicking the gear icon → Browser / Computer Use
Enable/Disable Browser Use
Purpose: Master toggle that enables Roo to interact with websites using a Puppeteer-controlled browser.
When to disable:
- Working in environments where browser automation is restricted
- Conserving system resources
- Focusing on non-web development tasks
To change this setting:
-
Check or uncheck the "Enable browser tool" checkbox within your Browser / Computer Use settings
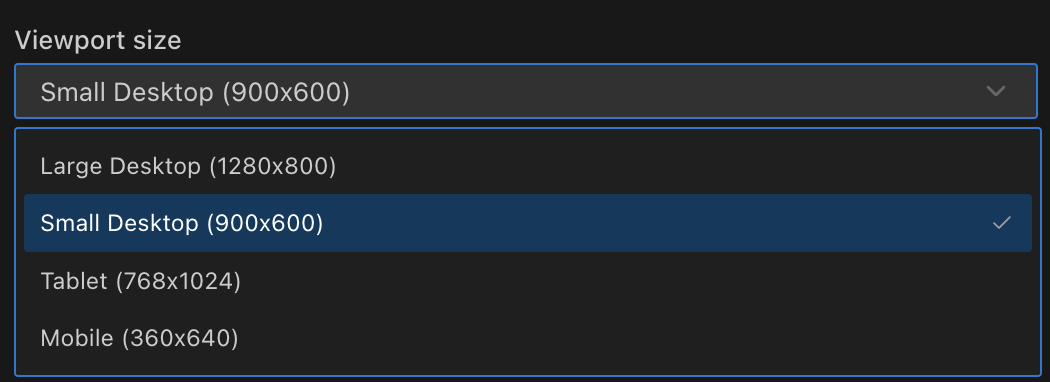
Viewport Size
Purpose: Determines the resolution of the browser session Roo Code uses. This affects how websites render and what content is visible.
Tradeoff: Higher resolutions provide a larger viewport but increase token usage due to larger screenshots.
Available Options:
| Resolution | Dimensions | Best For | Token Impact |
|---|---|---|---|
| Large Desktop | 1280x800 | Full desktop layouts | Highest |
| Small Desktop | 900x600 | Standard web apps (Default) | Medium |
| Tablet | 768x1024 | Responsive testing | Medium |
| Mobile | 360x640 | Mobile-first testing | Lowest |
To change this setting:
-
Click the dropdown menu under "Viewport size" within your Browser / Computer Use settings
-
Select your desired resolution
Choosing the Right Viewport:
- Large Desktop: Use when testing complex layouts or applications that require more screen real estate
- Small Desktop: Ideal for most web applications and general testing
- Tablet: Perfect for testing responsive designs and touch interfaces
- Mobile: Essential for mobile-first development and testing mobile user experiences
Screenshot Quality
Purpose: Controls the WebP compression quality of browser screenshots. This directly impacts both visual clarity and token consumption.
Tradeoff: Higher quality provides clearer screenshots but increases token usage.
Quality Guidelines:
| Quality Range | Use Case | Visual Impact | Token Usage |
|---|---|---|---|
| 1-40% | Text-only pages | Basic readability | Minimal |
| 40-60% | Simple layouts | Good for most text | Low |
| 60-75% | Standard web apps (Default) | Clear UI elements | Medium |
| 75-85% | Design review | High visual fidelity | High |
| 85-100% | Pixel-perfect testing | Maximum clarity | Very High |
To change this setting:
-
Adjust the slider under "Screenshot quality" within your Browser / Computer Use settings
-
Set a value between 1-100% (default is 75%)

Optimization Tips:
- Start with lower quality (40-50%) for text-heavy sites
- Increase to 80%+ only when visual details are critical
- Consider token costs when working with limited API budgets
- Use higher quality for debugging visual issues
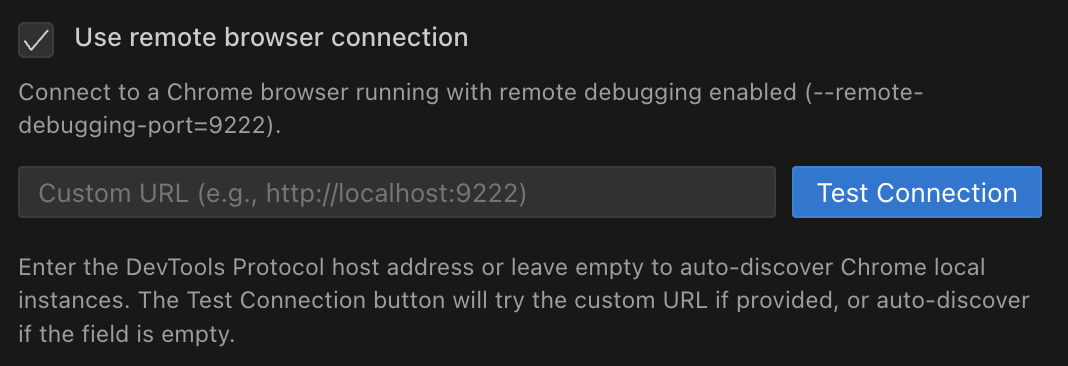
Remote Browser Connection
Purpose: Connect Roo to an existing Chrome browser instead of using the built-in headless browser. This enables advanced workflows and persistent sessions.
Benefits:
- Persistent Sessions: Maintain logged-in states between Roo sessions
- Visual Monitoring: Watch Roo interact with websites in real-time
- Custom Profiles: Use browser profiles with specific extensions or settings
- Container Support: Works in DevContainers and remote development environments
- Debugging: See exactly what Roo sees during interactions
Requirements: Chrome must be running with remote debugging enabled on port 9222.
To enable this feature:
-
Check the "Use remote browser connection" box in Browser / Computer Use settings
-
Click "Test Connection" to verify
Setting Up Remote Browser Connection
Step 1: Launch Chrome with Remote Debugging
Choose the appropriate command for your operating system:
macOS:
/Applications/Google\ Chrome.app/Contents/MacOS/Google\ Chrome \
  --remote-debugging-port=9222 \
  --user-data-dir=/tmp/chrome-debug \
  --no-first-run
Windows:
"C:\Program Files\Google\Chrome\Application\chrome.exe" ^
  --remote-debugging-port=9222 ^
  --user-data-dir=C:\chrome-debug ^
  --no-first-run
Linux:
google-chrome \
  --remote-debugging-port=9222 \
  --user-data-dir=/tmp/chrome-debug \
  --no-first-run
Step 2: Configure Roo Code
- Enable "Use remote browser connection" in settings
- Click "Test Connection"
- You should see "Connection successful" message
Step 3: Start Using
- Ask Roo to browse websites as normal
- Watch the interactions happen in the visible Chrome window
- The browser remains open between tasks, preserving state
Common Use Cases
DevContainers & Remote Development:
- Connect from containerized VS Code to host Chrome browser
- Bypass container networking limitations
- Access localhost services from the host machine
Authenticated Testing:
- Log into services once manually
- Roo can then interact with authenticated pages
- Eliminates repetitive login steps in testing workflows
Custom Chrome Profiles:
- Create profiles with specific extensions installed
- Use profiles with saved passwords and settings
- Test with different user configurations
Visual Debugging:
- Watch Roo's interactions in real-time
- Pause and inspect page state during automation
- Debug complex interaction sequences
Practical Examples and Use Cases
Web Application Testing
Scenario: Testing a multi-step form submission process
Please test our registration form at http://localhost:3000/register:
1. Fill in the form with test data
2. Try submitting with invalid email to check validation
3. Correct the email and submit successfully
4. Verify the success message appears
Responsive Design Verification
Scenario: Checking how your site looks on different devices
Check how our homepage looks on mobile:
1. Set viewport to mobile (360x640)
2. Visit https://example.com
3. Verify the mobile menu appears
4. Check that images are properly sized
5. Ensure text is readable without horizontal scrolling
Content Verification
Scenario: Ensuring dynamic content loads correctly
Visit our dashboard at http://localhost:3000/dashboard and verify:
1. The user profile loads in the sidebar
2. The main content area shows recent activity
3. The charts render properly
4. No console errors appear
E2E Testing Automation
Scenario: Automating end-to-end user flows
Test the complete purchase flow:
1. Go to http://localhost:3000/shop
2. Click on the first product
3. Add it to cart
4. Proceed to checkout
5. Fill in shipping details
6. Verify the order summary is correct
SEO and Meta Tag Checking
Scenario: Verifying SEO elements are present
Check the SEO setup on our blog post:
1. Visit https://example.com/blog/latest-post
2. Check if the page title is set correctly
3. Verify meta description is present
4. Ensure Open Graph tags are configured
5. Check for proper heading hierarchy
Security Considerations
Data Privacy
When using Browser Use, be aware that:
- Screenshots may contain sensitive information
- Form data entered during testing could be logged
- Console outputs might expose API keys or tokens
- Cookies and session data may be captured
Best Practices:
- Use test accounts and data, never production credentials
- Clear browser data after testing sensitive applications
- Review screenshots before sharing or committing
- Use environment variables for sensitive configuration
Network Security
Localhost Testing:
- Browser Use can access localhost and internal network resources
- Be cautious when testing applications with admin interfaces
- Ensure test environments are properly isolated
External Sites:
- Only interact with sites you own or have permission to test
- Be aware of rate limiting and terms of service
- Avoid automated interactions with production systems
Remote Browser Security
When using remote browser connections:
- The browser has full access to your system's network
- Saved passwords and cookies are accessible
- Extensions in the browser profile may affect behavior
- Consider using isolated browser profiles for testing
Recommendations:
- Create dedicated Chrome profiles for Roo Code testing
- Regularly clear browser data and cookies
- Use incognito mode when appropriate
- Monitor browser activity during automated sessions
Troubleshooting
Common Issues and Solutions
Browser Won't Launch
Problem: "Failed to launch browser" error
Solutions:
- Check Model: Ensure you're using Claude Sonnet 3.5 or 3.7
- System Resources: Verify sufficient RAM and CPU available
- Permissions: Check VS Code has permission to launch processes
- Puppeteer Installation: Reinstall the Roo Code extension if needed
Screenshots Not Displaying
Problem: Browser launches but screenshots don't appear
Solutions:
- Quality Settings: Increase screenshot quality if too low
- Viewport Size: Ensure viewport isn't set to 0x0
- Page Load: Wait for page to fully load before capturing
- Network Issues: Check if the target URL is accessible
Remote Browser Connection Failed
Problem: Can't connect to Chrome with remote debugging
Solutions:
-
Port Conflict: Ensure port 9222 isn't already in use
# Check if port is in use (Linux/Mac)
lsof -i :9222

# Check if port is in use (Windows)
netstat -an | findstr :9222 -
Chrome Launch: Verify Chrome started with correct flags
-
Firewall: Check firewall isn't blocking port 9222
-
Multiple Instances: Close other Chrome instances first
Interactions Not Working
Problem: Clicks or typing don't seem to affect the page
Solutions:
-
Wait for Elements: Ensure page elements are loaded
Wait for the page to load completely, then click the submit button -
Correct Coordinates: Verify click coordinates are accurate
-
JavaScript Rendering: Some SPAs need time to render
-
Frame/iframe Issues: Specify if content is in an iframe
High Token Usage
Problem: Browser operations consuming too many tokens
Solutions:
- Reduce Screenshot Quality: Lower to 40-60% for text-only pages
- Smaller Viewport: Use mobile or tablet viewport when possible
- Selective Screenshots: Only capture when necessary
- Batch Operations: Combine multiple actions before capturing
Session State Lost
Problem: Login state or data disappears between actions
Solutions:
- Use Remote Browser: Maintains persistent sessions
- Cookie Handling: Ensure cookies aren't being cleared
- Single Session: Complete all actions in one browser session
- Local Storage: Some apps use localStorage instead of cookies
Best Practices
Performance Optimization
- Minimize Screenshots: Only capture when verification is needed
- Batch Actions: Perform multiple actions before taking screenshots
- Appropriate Quality: Match quality settings to your needs
- Viewport Selection: Use the smallest viewport that meets requirements
Testing Workflows
- Start Simple: Begin with basic navigation before complex interactions
- Incremental Testing: Build up test scenarios step by step
- Error Handling: Ask Roo to check for console errors
- Validation Checks: Verify each step before proceeding
Development Integration
- Local Testing First: Test on localhost before production URLs
- Environment Variables: Use different URLs for dev/staging/prod
- Continuous Testing: Integrate browser tests into your workflow
- Documentation: Document test scenarios for team reference
Frequently Asked Questions
General Questions
Q: Can Browser Use work with any AI model? A: No, Browser Use requires Claude Sonnet 3.5 or 3.7. Other models don't currently support browser automation features.
Q: Is the browser visible when running? A: By default, the browser runs in headless mode (invisible). Use remote browser connection to see interactions in real-time.
Q: Can I use Browser Use for web scraping? A: While technically possible, ensure you comply with website terms of service and robots.txt files. Use responsibly and ethically.
Q: Does Browser Use work with all websites? A: Most websites work, but some with advanced anti-automation measures may block or limit functionality.
Technical Questions
Q: What browser engine does Roo Code use? A: Roo Code uses Puppeteer, which controls a headless Chromium browser.
Q: Can I use my existing Chrome profile? A: Yes, with remote browser connection you can use any Chrome profile with saved settings and extensions.
Q: How do I test authenticated areas of my application? A: Either use remote browser with manual login, or have Roo perform the login steps as part of the test sequence.
Q: Can Browser Use handle file uploads? A: File upload interactions are limited. Consider using API testing for file upload scenarios.
Q: Does it work with Single Page Applications (SPAs)? A: Yes, but you may need to add wait conditions for dynamic content to load.
Troubleshooting Questions
Q: Why do screenshots look blurry? A: Increase the screenshot quality setting. Default is 75%, try 85-90% for clearer images.
Q: Can I use Browser Use in a Docker container? A: Yes, but you'll need to use remote browser connection to a Chrome instance outside the container.
Q: Why does the browser close unexpectedly? A: The browser automatically closes when a task completes or encounters an error. Check for error messages in the output.
Q: How do I debug when interactions fail? A: Use remote browser connection to watch interactions in real-time, or ask Roo to capture console logs after each action.
Advanced Topics
Working with Dynamic Content
For JavaScript-heavy applications:
- Allow time for content to render
- Check for loading indicators
- Verify AJAX requests complete
- Use explicit wait conditions
Handling Authentication
Strategies for testing authenticated areas:
- Session Persistence: Use remote browser with saved login
- Automated Login: Include login steps in test sequence
- Token Injection: For development, inject auth tokens via console
- Test Accounts: Use dedicated test accounts with known credentials
Multi-Tab Testing
While Browser Use primarily works with single tabs:
- Focus on single-tab workflows
- Use multiple sequential sessions for multi-tab scenarios
- Consider API testing for complex multi-window interactions
Performance Testing
Basic performance checks with Browser Use:
- Measure page load times via console timing
- Check for console performance warnings
- Monitor network errors in console output
- Verify resource loading completion
See Also
- Auto-Approving Actions - Automate browser interactions without manual approval
- Using Modes - Understand different Roo Code operational modes
- How Tools Work - Learn about Roo Code's tool system
- Model Temperature - Configure AI model behavior for testing scenarios